Data search (faceted)
INSApplies to the
InSight ANM20Applies to the
Mars 2020 ANMERApplies to the
MER ANMSLApplies to the
MSL ANPHXApplies to the
PHX AN
Use data product search to find data based on constraints that you specify. Click on the Search tab on the left side of the screen. Then click on the data search tab at the top to get started. Depending on the mission, some filters listed below may not be available for searching. Note that the Phoenix Notebook data search has different controls than those shown below.
Overview
The data search window is divided into two parts. Search filters are displayed on the left side and a result list is shown on the right.
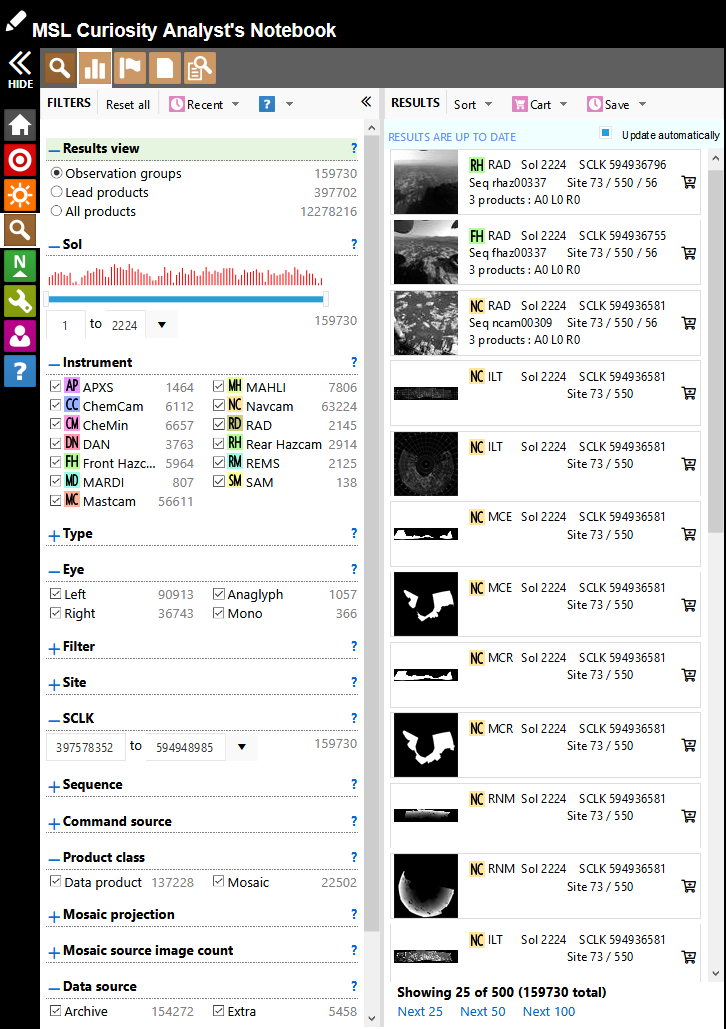
Use the search filters to find data. A number beside each filter value shows the number of products with that property. By selecting multiple filters, you can narrow down the result list. Use the reset links to return to default settings for one filter or for all filters.
Results are updated as filter settings are changed and a count of results is shown at the bottom of the list. Use the links below the result count to load additional results. When the result list is especially large, not all results can be shown. In that case, use additional filters to reduce the result set. Click on a data product in the result list to see specific details about that product.
The Filters section
Set values in the Filters section to constrain the data shown in the Results section. When a filter is set such that it affects the results, the filter heading will have a green background. If a filter is set incorrectly, the heading will have a red background. You can reset any filter by clicking on the reset link at the right side of the filter heading. Reset all filters by clicking on Reset all in the toolbar at the top of the Filters section.
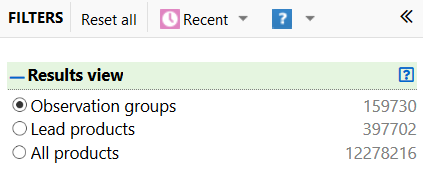
In the image above, the Results view filter is set to Observation groups. The green background indicates that the filter setting affects the current search result set (not shown). The counts to the right of each option indicate the size of the result set if that option is selected, taking into account any other filters that are set.
The reset link at the right side of the filter heading will revert this filter to its default setting. Note that the reset link only appears when hovering over the filter heading. The help link at the right edge of the filter heading pops up a small help tip for this filter.
Filters toolbar
The Filters toolbar appears at the top of the filters section.

Several actions are available:
- Click Reset all to reset all of the search filters.
- Select an entry from the Recent drop down menu that contains your last 10 saved data searches to set the filters. (Searches can be saved using the Results toolbar.)
- Access help on data searching.
- Collapse or expand the Filters section by clicking on or .
Filter descriptions
Results view
The results view filter controls how data products are grouped together for searching.
Choose your Results view based on the fields you are searching:
- Setting the Results view to Observation groups is best for high level searches with filters like sol, instrument, site, product class, command source, and data source, or mosaic filters like projection and source image count). An observation group is one or more observations from an instrument that are logically grouped. An example is a left and right stereo pair of Navcam images.
- Lead products makes sense when your search includes eye, filter, SCLK, and sequence. The lead product is the data product from an observation that serves as a representative for that single observation. An example is the linearized radiometrically-corrected image for all raw and derived product types of that same image.
- Use All products when your search includes product type or ID. All products are considered.
See Understanding data products for details on product types and grouping.
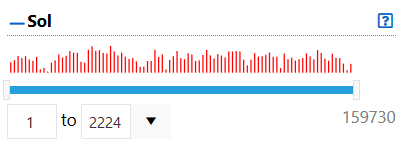
Sol
A sol is a Martian day, with Sol 1 defined as the first full day of operations after landing. Use the sliders or enter numeric values to indicate a range of sols. Use the drop down menu to quickly enter an ending sol value based on the starting sol value.
Above the sliders and text box is a histogram showing the distribution of results by sol based on the currently set filters.
Instrument
Select one or more instruments to restrict the returned data. Note the high-level nature of the instrument options: left and right 
 Navcam images are grouped simply as "Navcam". For MSL,
  ChemCam LIBS and RMI data are grouped as "ChemCam".
Site and drive
A site is designated by the science team as a location delineated from its neighbors by one or more characteristics, such as distance and surface properties. Site numbers increment over time at irregular intervals.
A drive (sometimes called a "position" in the daily reports) is a location within a single site. That is, a single site may comprise multiple positions. While drive numbers increment with time within a site, they are not sequential. When the site number is incremented, the drive number is reset to zero.
Enter a site number as a decimal number or using the two-character values used in the filename. The valid drive numbers for the given site will appear in the Drive drop-down list.
Eye
Some instruments, such as 
 Hazcam, Navcam,
  MER Pancam and
  MSL Mastcam, have left and right cameras. Use the Eye filter to search for data for a specific eye.
Filter
This value can represent a color flag or a filter, illumination, or cover state for an image. The Mars 2020, MER Pancam, and MSL Mastcam instruments use values as shown below. Use the Filter option to specify one or more filters.
mission specific
Unless specified in the Mastcam-Z, PIXL, and SHERLOC filter tables below, these filters can apply to images.
| Filter value |
Description |
|---|---|
| A | Upper green Bayer cells (G1) |
| D | Lower green Bayer cells (G2) |
| E | Raw Bayer pattern |
| M | Grayscale image (monochromatic/panchromatic) |
| O | Other |
| _ | Not applicable |
For all color cameras, the flag is set based on the color space depending on whether the product is a 3-band product, or an individual band.
| Color type | Filter value | |||
|---|---|---|---|---|
| 3-band | Band 1 | Band 2 | Band 3 | |
| RGB | F | R | G | B |
| XYZ | T | X | Y | Z |
| xyY | C | J | K | L |
| HSI | P | H | S | I |
Only “E”, “F”, or “M” or Filter/LED can appear in EDRs.
For Bayered images, the filter is replaced by the color flag at the debayering step.
|
Filter
number |
Pancam Left
λeff ± HWHM (nm) |
Pancam Right
λeff ± HWHM (nm) |
|---|---|---|
| 0 (Red Bayer) | 630 ± 43 | 631 ± 43 |
| 0 (Green Bayer) | 544 ± 41 | 544 ± 42 |
| 0 (Blue Bayer) | 480 ± 46 | 480 ± 46 |
| 1 | 800 ± 9 | 800 ± 9 |
| 2 | 754 ± 10 | 866 ± 10 |
| 3 | 677 ± 11 | 910 ± 12 |
| 4 | 605 ± 9 | 939 ± 12 |
| 5 | 628 ± 11 | 978 ± 10 |
| 6 | 442 ± 12 | 1022 ± 19 |
| 7 | 590 ± 88 | 880 ± 10 |
λeff is the effective band center wavelength, calculated as the weighted average of the normalized system spectral response (including optics, filter, and CCD) and the solar radiance at the top of the Martian atmosphere. HWHM is the half-width of the bandpass at half-maximum for each filter.
|
Filter
value |
LED color
|
|---|---|
| B | Blue |
| D | SLI-A (dense) |
| E | UV |
| G | Green |
| O | Other |
| R | Red |
| S | SLI-B (sparse) |
| W | White (multiple) |
| _ | Off |
|
Filter
value |
State
|
|---|---|
| 0 | Cover closed, LEDs off |
| 1 | Cover open, LEDs off |
| 2 | Cover closed, LEDs on |
| 3 | Cover open, LEDs on |
| F | RGB color |
|
Filter
number |
Mastcam Left
center wavelength |
Mastcam Right
center wavelength |
|---|---|---|
| 0 | Clear | Clear |
| 1 | 525 nm | 525 nm |
| 2 | 440 nm | 440 nm |
| 3 | 750 nm | 800 nm |
| 4 | 675 nm | 905 nm |
| 5 | 865 nm | 935 nm |
| 6 | 1035 nm | 1035 nm |
| 7 | 880 nm | 440 nm |
|
Filter
number |
Pancam Left
center wavelength |
Pancam Right
center wavelength |
|---|---|---|
| 0 | Clear | Clear |
| 1 | 739 nm | 436 nm |
| 2 | 753 nm | 754 nm |
| 3 | 673 nm | 803 nm |
| 4 | 601 nm | 864 nm |
| 5 | 535 nm | 904 nm |
| 6 | 482 nm | 934 nm |
| 7 | 432 nm | 1009 nm |
| 8 | 440 nm | 880 nm |
Product type
Observational data may be represented in multiple types of products, such as a radiometrically corrected image, initial spectrum, and slope map. There are hundreds of product types. Refer to Software Interface Specification (SIS) documents for individual instruments to find out more about specific product types.
Solar longitude
The position of Mars in it's orbit about the sun can be measured as solar longitude. The 0° position is Mars' location at the vernal (spring) equinox and increases to 90° at the summer solstice, 180° at the autumnal equinox, and 270° at the winter solstice, all northern hemisphere seasons.
Filter results for solar longitude by entering a starting and ending value. Note that when an instrument's data products do not include a solar longitude, filtering by this field will not return any data for that instrument (e.g., InSight Instrument Deployment Arm (IDA).
SCLK (Spacecraft Clock Count)
The SCLK filter searches against the start time of an observation. For most instruments, the starting SCLK value is taken from the label. When products do not define the SCLK, it is calculated from the UTC start time value using SPICE data.
Enter a starting and ending SCLK value to indicate a range of values for searching. Use the drop down menu to quickly enter an ending value based on the starting value.
Image measurements
Some images are acquired as part of a stereo pair from which XYZ values are derived. When available, these XYZ data are used to make position-based measurements using the Image tool measurement tools, such as location, distance, and profile. Check the box labeled "Only images supporting measurements" to restrict the search to products with corresponding XYZ data. When unchecked, the search does not test for the presence or absence of XYZ data.
Product class
All archived data—images, spectra, etc.—can be thought of data products. In the context of the Product class filter, data products refers to single frame image and data from non-imaging instruments.
Mosaics are considered as having their own product class. There are two types of mosaic (panorama) images in the Notebook.
- Archive mosaics are produced by the science team and are part of the PDS archive.
- Context mosaics are produced by the Notebook team to provide context when there is no archive mosaic.
Mosaic projection
The projection is known for most image mosaics. Available projections are:
-
 Cylindrical
 -
 Cylindrical perspective
 -
 Perspective
 -
 Polar
Polar -
 Vertical perspective
Mosaic source image count
This filter searches against the number of single frame images that comprise a mosaic.
Sequence
Command Sequence IDs reference the set of commands that produce one or more data products. Select a sequence from the drop down list which contains only sequences that match any other filters that are set.
Most command sequence details are beyond the scope of the data archive and are not publicly available.
Command source
The command source value identifies the flight software element that requested the data and is limited to data from  ChemCam,
  CheMin, and images. Many data products do not have a command source value. Use this filter when searching on Navcam data to find/avoid sun images, autonav images, etc.
Data source
During the course of the mission, some data products are developed that were not originally envisioned for release. In the Notebook, they are referred to as Extras or Special products. For general purposes, this filter does not need to be modified.
ID (LIDVID, LID, Product ID)
Use the ID filter to search with a product's identifier. An asterisk (*) can be used as a wildcard to represent one or more characters. When searching by ID, consider setting Results view to Lead products or All products.
|
Mission
|
Identifier type
|
Description
|
|---|---|---|
| M20Applies to the Mars 2020 AN |
LIDVID |
The LIDVID is the product's logical identifier and version number in a single value. Example: urn:nasa:pds:mars2020_hazcam_ops_calibrated:data:flf_1374_0788919127_387rad_n0642278fhaz00206_0a0295j::2.0 |
| LID |
The LID is the product's logical identifier (without the version number). Example: urn:nasa:pds:mars2020_hazcam_ops_calibrated:data:flf_1374_0788919127_387rad_n0642278fhaz00206_0a0295j |
|
| Product ID (PDS4) |
The Product ID is the text after the last colon (:) separator in the LID. Example: flf_1374_0788919127_387rad_n0642278fhaz00206_0a0295j |
|
| MERApplies to the MER AN MSLApplies to the MSL AN PHXApplies to the PHX AN |
Product ID (PDS3) |
The PDS3 Product ID from the label. |
| INSApplies to the InSight AN |
Product ID (PDS4) | We are transitioning the InSight AN for full PDS4 compatibility. Currently, InSight search accepts only the product ID from the LID (generally, the same as the filename without the extension). |
Product ID values are often the same as the product's filename minus the extension. If you are using a filename, wildcards might be helpful. Note that in a few instances instrument teams used different separators in the product ID than in the filename, for example hyphens in one and underscores in the other.
The Results section
As filters are set, found items are updated automatically and are displayed in the results section. From here you can view data or add it to your cart for bulk download. In addition, you can save the search to your history for later use.
Results toolbar
The Results toolbar appears at the top of the results section.

Several actions are available:
- Sort the results by instrument, time, or sequence ID.
- Add multiple items to the cart with a click.
- Save the current search and results to your history. (Recent searches can be loaded using the Filters toolbar.)
Working with individual results
When filters are applied, the first 25 results are shown in the results section. The bottom of the results list shows how many results are found and also offers links for showing additional results. Up to 500 results can be shown.
Clicking on an item in the results list will open the item in detail view. Clicking the cart icon to the right of the item will add or remove the item from your cart.
Adding items to the cart
Two methods are available for adding search results items to your cart.
- Click the cart icon to the right of an item to add or remove the given item.
- Use the Cart menu item in the Results toolbar.
- Add shown items to cart adds the visible items to your cart as though you had clicked each item's cart icon individually.
- Add found items to cart places the items in your cart as a single unit. The item's cart icons in the results list will not change, and you will have to go your cart to remove them if desired. The benefit of this approach is to reduce the number of clicks required when adding more than a few items to the cart.
see also
- See Getting started with search for general information about search.
- Understanding data products